Some of you must be having a broadband connection with an ADSL modem. It is possible that you might have come across a situation where the LAN connection icon on the task bar shows limited connectivity. When there is a limited connectivity you may not be able to access the internet or share files between the networked computers. How do you solve this problem?
First and foremost thing that you need to do when your system is networked is that you need to write down the IP address allocated to the computer, subnet mask and the default gateway. Please also jot down the main DNS server IP and alternate DNS IP and keep them handy. If you have not done that earlier, never bother. Right click on the LAN icon and select the repair option. The windows diagnostics tools repair the problem by changing the limited connectivity to full connectivity. Sometimes, it doesn’t work that way. Then, right click on the LAN icon and select the status.
In the popup window click the properties button and a next window opens with the list of properties. Here select the TCP/IP option and click on the properties button. In the next window there are two options- assigning IP automatically and the other assign IP manually. Select the first option i.e., assign IP automatically and then save the settings. This should solve the problem. Wait for two minutes by which time the system assigns an IP address and you can get back the full connectivity.
Even, if this does not solve the problem check the documentation guide provided with the ADSL modem where they provide you the IP address which you need to enter under the “assign IP address manually” and save the settings. Immediately after you enter the IP address and hit the tab button the subnet mask address is automatically entered. You need to enter the default gateway address which can be done by doing some guesswork. I will just show you with an example:
Go to the select IP address manually and enter the IP address: 192.168.1.1 (or whatever is given in the ADSL modem documentation). The subnet mask IP is 255.255.255.0 (this comes automatically). Now you need to enter the default gateway IP. Keep the first three numbers constant i.e., 192,168,1 and enter the fourth digit. It can be anything from 2 to 116 and then save changes. And this will solve the problem. Happy surfing.
Note: You need not assign the DNS IP manually, select the automatic DNS option.
Thursday, February 25, 2010
Sunday, February 14, 2010
OS for PC: Linux or Windows
We need computer more than any other gadget. To run a computer it needs an operating system. Linux and Windows are two operating systems that are highly popular. Every computer needs one or the other of these two operating systems for its functionality. The latest to join the race is Google OS. In the following article you can find a thorough comparison of the two most popular operating systems Linux and Windows. Enjoy reading the post and gain valuable insight to the operating system. Click here to read.
Sunday, February 7, 2010
Some keyboard shortcuts for MS-Word 2007
ctrl+F1 - hides the tool bar
- once gain the same command brings back the toolbar
ctrl+F2 - Displays print preview of the document
- once agin the same command shows the document in its normal view
ctrl+F4 - Closes the current document but leaves the word template intact
ctrl+F9 - Inserts a pair of flower brackets in the document
ctrl+F10 - reduces the size of the window but leaves it sufficiently open to carryout the work.
Once again the same command maximizes the window
ctrl+F12- use this command to open another existing doument
Press Alt in an open document - shows the letters to click to execute a command
Few examples are:
Alt+f - opens the file command and further letters are listed adjacent to the available options. Scroll down using a mouse and execute the option by pressing Alt & the letter eg:Alt+o - to open another existing document. IF you want to back to the previous level press "esc".
Alt+h - opens the home options with further command letters displayed near each option
Alt+n -Insert command and further options as above
Alt+p - page layout command and further options as above
Alt+s - references command and further options as above
Alt+m - mailings command and further options as above
Alt+ r - review command and further options as above
Alt+w - view command and further options as above
Alt+l - developer command and further options as above
How to speed up your computer?
Everyone's got a computer these days. There are hardly any computers that are not connected to the Internet. These days we get computers exclusively for browsing the web. You may have the best configuration available in the market but after a week of heavy browsing you find that your computer has slowed down over the previous week. There are some simple steps to follow to get back the original speed.
If you are using an internet explorer do this:
1. Right click on the internet explorer icon and select properties.
2. Under the general options you find a header called "browsing history" that says delete temporary files, history, cookies, saved passwords and web information.
3. Under this option click on the Delete button.
4. Next pops out a window "delete browsing history" and by default the check boxes for preserve favorites website data, temporary internet files, cookies and history are checked.
5. You should also check the remaining boxes of form data, passwords and inprivate filtering data and then click delete. Close the properties dialog box now and see the speeds improve.
If you are using a chrome explorer
1. Double click on the chrome explorer icon.
2. Use Ctrl+h and the history tab opens as a separate page. 3. Delete the history and enjoy faster browsing.
If you are using a firefox browser of mozilla.
1. Double clikc on the mozilla firefox explorer.
2. Go to tools and select history.
3. Select clear private data now.
4. A dialog box opens where you select all the check boxes and say clear now. That's it.
Now you can enjoy faster browsing and you find that the speed of your system has improved enormusly.
Saturday, January 30, 2010
Universal Serial Bus – what is it?
The USB has a port connection often located at the rear of the computer and these days there are one or two provided on the front of the cabinet. Most computers have a USB port that is used to connect various types of peripherals to the computer system. USB brings Plug and Play capabilities to peripherals connected outside the PC. These peripherals are automatically configured when attached to the USB port and a reboot is not necessary to use the component. A few examples are the portable hard disks, the pen drive or flash drive, net connect cards provided by Internet service providers etc.
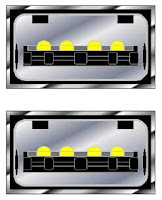
Example of USB Ports
Theoretically, you can daisy chain (connect various devices to each other in series) 127 devices to each USB port. However, in reality any more than five devices require a USB hub. The current USB specification, version 2.0, supports a data transfer rate of 480 Mb/sec. Version 2.0 is backward compatible with earlier versions 1.1 and 1.0 that used 12 Mb/sec. and 1.5 Mb/sec. rates.
USB is a continually evolving technology, as evidenced by the announcement of USB 3.0. USB 3.0 increases the speed rating of external devices by ten times that of USB 2.0, transferring data at 4.8 Gb/sec. USB 3.0 will be fully compatible with 2.0 and 1.1 devices.
In addition to wired USB solutions, there are recent innovations in Wireless USB (WUSB). WUSB allows for USB 2.0 speeds to devices within three meters of a computer. Wireless USB works similarly to Bluetooth, but features a reduced range to support higher transfer speeds.
We cannot imagine a system without an USB port these days! I personally use an USB port to transfer photographs from my digital camera, for synchronizing data between the internal hard disk and the external hard disk, occasional use of pen drive, to insert the Bluetooth dongle, wireless modem, the mouse and the keyboard, etc.
Troubleshooting printer tips
These days there are network printers in use. Many of the times when there is need for quick printing in situations like- in the midst of meetings and conferences at short notice, we find that the prints are not coming out of the printer. Many of us feel that the printer many manufacturers are to be blamed for the shabby work. Let’s face the reality that we never have the time to read the voluminous manuals that are provided by the manufacturers. Here you can find step by step solutions to common printing jobs using a network printer.
· Ensure that the printer is powered on and there are sufficient papers loaded in the printer. Also ensure that the power cord and the network cable is snugly fixed in the printer port, both ends at the computer as well as the printer (this is not required in case of Bluetooth operated network printers.
· Select the document you want to print and open it. Select Ctrl +p and pops out the fig .1on your screen.
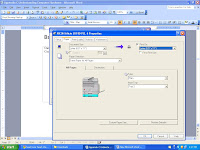 Fig.4
Fig.4
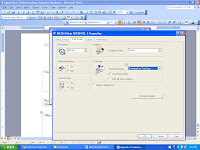
Fig.5
· If you select print quality you can find the quality options by clicking on the suitable options and finally click ok. The fig.1 comes back again on the screen. Select the number of copies you want to print ok and you would get super clean printouts without any interruption.
· Ensure that the printer is powered on and there are sufficient papers loaded in the printer. Also ensure that the power cord and the network cable is snugly fixed in the printer port, both ends at the computer as well as the printer (this is not required in case of Bluetooth operated network printers.
· Select the document you want to print and open it. Select Ctrl +p and pops out the fig .1on your screen.
Fig. 1 
· In fig .1 above see to it that the status is set to idle or ready. Select the page no. you want to print or all the pages whatever. Now click on the properties in fig.1 and the fig.2 pops up. Fig.2
Fig.2
· Select whether you want to print on one side or on both sides of the paper by clicking on the dropdown box under duplex .Select the orientation whether you want to print in portrait form or landscape form. Next click on the paper option of fig.2 and pops out fig.3
 Fig.3
Fig.3
· Here it is very important to select the document size by using the dropdown menu. Also select the print on box by clicking on it and select the suitable size of the paper. In the printer diagram shown in fig.3 click the mouse on number 1 or 2 to select one of the trays. Make sure that the same kind of paper is fed in the tray as you want the output. Suppose you want A4 print, load A4 paper physically in tray 2 of the printer and select 2 with the mouse on the printer diagram in fig.3. You can see how it looks in fig.4
Fig.4Fig.5
· If you select print quality you can find the quality options by clicking on the suitable options and finally click ok. The fig.1 comes back again on the screen. Select the number of copies you want to print ok and you would get super clean printouts without any interruption.
Monday, January 18, 2010
Removal instructions for older versions of Backdoor.SubSever
CAUTION: Follow these instructions only if the instructions in the previous sections did not remove the Trojan.
To remove this Trojan, you need to do the following:
1. Restart the computer in Safe mode.
2. Remove the following registry key that was placed there by the Trojan:
HKEY_LOCAL_MACHINE\SOFTWARE\Microsoft\Windows\CurrentVersion\Run\System Traylcon
3. Restart in MS-DOS mode, and then delete the \Windows\Systemtrayicon.exe file.
4. Restart Windows, and then rename the Watching.dll file.
'
The details for each of these steps follows:
Restart the computer in Safe mode
Before you edit the registry, you need to restart Windows in Safe mode. This can take several minutes.
NOTE: In Safe mode, Windows uses default settings: VGA monitor, no network, Microsoft mouse driver, and the minimum device drivers required to start Windows. You will not have access to CD-ROM drives, printers, or other devices.
Questions n Answers about subseven
How does the Trojan get on the computer?
SubSeven is usually sent as a program that you think you want. It almost always has an .exe extension, and it will often be disguised as an installation program, such as Setup.exe. When this program runs, it will usually just return a "Failed" error message, but it can sometimes do something, such as play a game or appear to install the software. We strongly recommend that you only install programs received from trusted sources.
How does someone else know that this is on the computer?
Backdoor.SubSeven can be configured to email your IP address, and the port on which the server is running, to the person who sent it to you. It can also send out an alert through some messaging programs.
What are some of the symptoms of a computer that is infected with the Backdoor.SubSeven Trojan?
Any of the following symptoms will occur only while connected to the Internet:
· CD-ROM drive opens at random times
· Wave (.wav) files play for no reason
· Strange dialog boxes appear
· Internet downloads are very slow
· Files appear or disappear
Subscribe to:
Posts (Atom)