Saturday, January 30, 2010

Universal Serial Bus – what is it?

The USB has a port connection often located at the rear of the computer and these days there are one or two provided on the front of the cabinet. Most computers have a USB port that is used to connect various types of peripherals to the computer system. USB brings Plug and Play capabilities to peripherals connected outside the PC. These peripherals are automatically configured when attached to the USB port and a reboot is not necessary to use the component. A few examples are the portable hard disks, the pen drive or flash drive, net connect cards provided by Internet service providers etc.

Example of USB Ports


Theoretically, you can daisy chain (connect various devices to each other in series) 127 devices to each USB port. However, in reality any more than five devices require a USB hub. The current USB specification, version 2.0, supports a data transfer rate of 480 Mb/sec. Version 2.0 is backward compatible with earlier versions 1.1 and 1.0 that used 12 Mb/sec. and 1.5 Mb/sec. rates.

USB is a continually evolving technology, as evidenced by the announcement of USB 3.0. USB 3.0 increases the speed rating of external devices by ten times that of USB 2.0, transferring data at 4.8 Gb/sec. USB 3.0 will be fully compatible with 2.0 and 1.1 devices.

In addition to wired USB solutions, there are recent innovations in Wireless USB (WUSB). WUSB allows for USB 2.0 speeds to devices within three meters of a computer. Wireless USB works similarly to Bluetooth, but features a reduced range to support higher transfer speeds.

We cannot imagine a system without an USB port these days! I personally use an USB port to transfer photographs from my digital camera, for synchronizing data between the internal hard disk and the external hard disk, occasional use of pen drive, to insert the Bluetooth dongle, wireless modem, the mouse and the keyboard, etc.

Troubleshooting printer tips

These days there are network printers in use. Many of the times when there is need for quick printing in situations like- in the midst of meetings and conferences at short notice, we find that the prints are not coming out of the printer. Many of us feel that the printer many manufacturers are to be blamed for the shabby work. Let’s face the reality that we never have the time to read the voluminous manuals that are provided by the manufacturers. Here you can find step by step solutions to common printing jobs using a network printer.
· Ensure that the printer is powered on and there are sufficient papers loaded in the printer. Also ensure that the power cord and the network cable is snugly fixed in the printer port, both ends at the computer as well as the printer (this is not required in case of Bluetooth operated network printers.
· Select the document you want to print and open it. Select Ctrl +p and pops out the fig .1on your screen.


Fig. 1
· In fig .1 above see to it that the status is set to idle or ready. Select the page no. you want to print or all the pages whatever. Now click on the properties in fig.1 and the fig.2 pops up.

Fig.2
· Select whether you want to print on one side or on both sides of the paper by clicking on the dropdown box under duplex .Select the orientation whether you want to print in portrait form or landscape form. Next click on the paper option of fig.2 and pops out fig.3


Fig.3
· Here it is very important to select the document size by using the dropdown menu. Also select the print on box by clicking on it and select the suitable size of the paper. In the printer diagram shown in fig.3 click the mouse on number 1 or 2 to select one of the trays. Make sure that the same kind of paper is fed in the tray as you want the output. Suppose you want A4 print, load A4 paper physically in tray 2 of the printer and select 2 with the mouse on the printer diagram in fig.3. You can see how it looks in fig.4


Fig.4


Fig.5
· If you select print quality you can find the quality options by clicking on the suitable options and finally click ok. The fig.1 comes back again on the screen. Select the number of copies you want to print ok and you would get super clean printouts without any interruption.

Monday, January 18, 2010

Removal instructions for older versions of Backdoor.SubSever

CAUTION: Follow these instructions only if the instructions in the previous sections did not remove the Trojan.

To remove this Trojan, you need to do the following:
1. Restart the computer in Safe mode.
2. Remove the following registry key that was placed there by the Trojan:

HKEY_LOCAL_MACHINE\SOFTWARE\Microsoft\Windows\CurrentVersion\Run\System Traylcon

3. Restart in MS-DOS mode, and then delete the \Windows\Systemtrayicon.exe file.
4. Restart Windows, and then rename the Watching.dll file.
'
The details for each of these steps follows:

Restart the computer in Safe mode
Before you edit the registry, you need to restart Windows in Safe mode. This can take several minutes.

NOTE: In Safe mode, Windows uses default settings: VGA monitor, no network, Microsoft mouse driver, and the minimum device drivers required to start Windows. You will not have access to CD-ROM drives, printers, or other devices.

Questions n Answers about subseven

How does the Trojan get on the computer?
SubSeven is usually sent as a program that you think you want. It almost always has an .exe extension, and it will often be disguised as an installation program, such as Setup.exe. When this program runs, it will usually just return a "Failed" error message, but it can sometimes do something, such as play a game or appear to install the software. We strongly recommend that you only install programs received from trusted sources.

How does someone else know that this is on the computer?
Backdoor.SubSeven can be configured to email your IP address, and the port on which the server is running, to the person who sent it to you. It can also send out an alert through some messaging programs.

What are some of the symptoms of a computer that is infected with the Backdoor.SubSeven Trojan?
Any of the following symptoms will occur only while connected to the Internet:
· CD-ROM drive opens at random times
· Wave (.wav) files play for no reason
· Strange dialog boxes appear
· Internet downloads are very slow
· Files appear or disappear

Backdoor Trojan Horse -Removal instructions:

To remove Backdoor.Subseven you need to do the following:
· Run Update to make sure that you have the most recent definitions.
· Run a full system scan, making sure that antivirus software is set to scan all files.
· Make a copy of the Regedit.exe file with the .com extension (if necessary).
· Remove the references added to the Win.ini and System.ini files.
· Remove the references added to the Windows registry.
For detailed instructions, see the sections that follow.

NOTES:
· This is a random-name file creator. We will use the example Eutccec.exe in this document. Please substitute the randomly named file that you find on the system.
To run Update and then scan with AV software
Run Update, and then run a full system scan. Make sure that Antivirus is set to scan all files.

NOTE: If you cannot do this because you cannot run program files, go first to the section titled To copy Regedit.exe to Regedit.com; otherwise, skip to the section titled To edit the registry.

To copy Regedit.exe to Regedit.com:
If you cannot run program files, then you must copy Regedit.exe to Regedit.com; otherwise, skip to the next section.
1. Do one of the following, depending on which operating system you are running:
o Windows NT/2000/XP
1. Click Start, and click Run.
2. Click Browse, and then browse to the \Winnt\system32 folder.
3. Double-click the Command.com file, and then click OK.
1. Type copy regedit.exe regedit.com and then press Enter.
2. Type start regedit.com and then press Enter.
3. Proceed to To edit the registry.

NOTES:
· The Registry Editor will open in front of the DOS window. After you finish editing the registry and have closed the Registry Editor, then close the DOS window, as well.
· After BackDoor.Subseven has been successfully removed, then you may delete the Regedit.com file.
To edit the registry

CAUTION: It is strongly recommend that you back up the system registry before making any changes. Incorrect changes to the registry can result in permanent data loss or corrupted files. Please make sure you modify only the keys specified in this document.
1. Start the Registry Editor if necessary:
o If you performed the procedures in the previous section, then the Registry Editor is already open. Skip to step 4.
o If it was not necessary to perform the procedures in the previous section, then proceed to step 2.
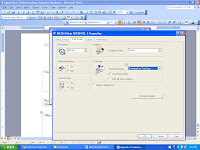
2. Click Start, and click Run. The Run dialog box appears.
3. Type regedit and then click OK. The Registry Editor opens.
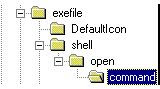
4. Navigate to and open the following key:

HKEY_LOCAL_MACHINE\Software\Classes\exefile\shell\open\command

CAUTION: Do not inadvertently modify the HKEY_LOCAL_MACHINE\SOFTWARE\Classes\.exe subkey. Changes made to that key can prevent .exe files (program files) from running. Be sure to navigate to the HKEY_LOCAL_MACHINE\SOFTWARE\Classes\exefile\shell\open\command subkey as shown in the following figure.


5. Double-click the (Default) value in the right pane.
6. Delete the current value data, and then type: "%1" %* (quote-percent-one-quote-space-percent-asterisk.)

NOTE: The Registry Editor will automatically enclose the value within quotation marks. When you click OK, the (Default) value should look exactly like this: ""%1" %*"

Make sure that you completely delete all value data in the command key prior to typing the correct data. If you accidentally leave a space at the beginning of the entry, any attempt to run program files will result in the error message "Windows cannot find .exe." If this happens to you, then start over at the beginning of this document, making sure to completely remove the current value data.

7. Navigate to and select the following key:

HKEY_LOCAL_MACHINE\Software\Microsoft\Windows\CurrentVersion\Run

8. In the right pane, look under the Name column, and delete any of the following values if you see them:

WINLOADER, Win32nt, Win32.Bin, WinCrypt, WinProtect, Win, xTnow, Ayespie,
PowerSaveMonitor, rundll32

NOTE:Other values may appear, which are not on this list. Deleting values from this location does not prevent the programs from running; it only prevents them from starting automatically when Windows starts.

9. Navigate to and select the following key:

HKEY_LOCAL_MACHINE\Software\Microsoft\
Windows\CurrentVersion\RunServices

10. In the right pane, look under the Name column, and delete any of the following values if you see them:
WINLOADER
Win32nt
Win32.Bin
WinProtect
Win
xTnow
Ayespie
PowerSaveMonitor
rundll32

NOTE: Other values may appear, which are not on this list. Deleting values from this location does not prevent the programs from running; it only prevents them from starting automatically when Windows starts.

11. Exit the Registry Editor.

Edit Windows startup files

1. Click Start, and click Run.
2. Type the following command, and then press Enter to open the System Configuration Editor.
sysedit
NOTE: If you see the message "Windows cannot find .exe", then repeat steps 1 through 6 in the previous section, and make sure that you typed the text exactly as shown. If you do not see an error message, then proceed to the next step.
3. Close the Autoexec.bat and Config.sys windows in the System Configuration Editor.
CAUTION: The steps that follow instruct you to remove text from the load= and run= lines of the Win.ini file. If you are using older programs, they may be loading at startup from one of these lines. The Trojan adds lines such as load=c:\windows\temp\pkg2350.exe or run=hpfsched msrexe.exe. (In this example, hpfsched is a legitimate program, but msrexe.exe is part of the Trojan). It may also modify the shell= statement, for example, to shell=explorer.exe pwrsvm.exe

If you are sure that the text contained in these lines are for programs that you normally use, then we suggest that you do not remove them. If you are not sure, but the text does not refer to the file names shown, then you can prevent the lines from loading by placing a semicolon in the first character position of the line. For example:
; run=accounts.exe
4. Locate the load= line within the [windows] section of the Win.ini file; it is usually located near the top of the file.
5. Position the cursor immediately to the right of the equal (=) sign.
6. Press Shift+End to select all of the text to the right of the equal sign, and then press Delete.
7. Repeat steps 4 to 6 for the run= line, which is usually beneath the load= line.
8. Close the Win.ini window, and click Yes when you are prompted whether to save the changes.
9. Locate the shell=explorer.exe line within the [boot] section of the System.ini file; it is usually located near the top of the file.
10. Position the cursor immediately to the right of explorer.exe.
11. Press Shift+End to select all of the text to the right of explorer.exe and then press Delete.
12. Close the System.ini window, and click Yes when you are prompted whether to save the changes.

NOTE: Some computers may have an entry other than explorer.exe after shell=. If this is the case, and you are running an alternate Windows shell, then change this line to shell=explorer.exe for now. You can change it back to your alternate shell after you have finished this procedure.

13. Exit the System Configuration Editor.
14. Click Start, point to Settings, and click Control Panel.
15. Double-click the Display icon.
16. Click the Screen Saver tab, and then change the currently selected screen saver. If it is set to (None), then select any of the available screen savers. The important thing is that you make a change to the current setting.
17. Click OK, and then close the Control Panel.
This completes the removal part of the process. Even if you did so previously, start antivirus and run a full system scan. Delete any files found to be infected with Backdoor.Subseven. When finished, restart the computer.

Backdoor Trojan Horse - overview

Backdoor.SubSeven is a Trojan horse, similar to Netbus or Back Orifice. It enables unauthorized people to access your computer over the Internet without your knowledge. When the server portion of the program is running on a computer, it is possible for the person who is accessing the computer remotely to do the following:
· Set it up as an FTP server
· Browse files on that system
· Take screen shots
· Capture real-time screen information
· Open and close programs
· Edit information in currently running programs
· Show pop-up messages and dialog boxes
· Hang up a dial-up connection
· Restart a computer remotely
· Open the CD-ROM
· Edit registry information

When it is run, BackDoor.Subseven makes the following changes to the system:
· Drops (adds) a copy of itself and a randomly named executable file, such as Eutccec.exe, to the \Windows or \Windows\System folder.
· Adds the dropped file to the load= and run= lines of the Win.ini file.
· Adds the dropped file name to the shell=explorer.exe line of the System.ini file.
· Creates the WinLoader value and sets it equal to the dropped file name in the following registry keys.
· Modifies the (Default) value from "%1" %* to, for example, eutccec.exe "%1" %* in the following registry keys:

HKEY_LOCAL_MACHINE\Software\Classes\
exefile\shell\open\command

HKEY_LOCAL_MACHINE\Software\Microsoft\
Windows\CurrentVersion\Run

Boot Process explained in simple steps:

A Computer is designed to start in a predictable way from the moment you press the Power On button until the moment the operating system loads. The list below outlines the steps.
1. Power good signal is sent to the CPU -> When you press the Power On button
2. CPU looks at ROM for basic instructions (BIOS)-> When CPU receives power good signal
3. System BIOS loads
4. BIOS initiates Power-On Self Test (POST)
5. POST checks RAM and then Video. If either of these have a problem, there are various beep codes. -> Typically, a procession of long single beeps for RAM; one long and two short for video. Motherboard documentation contains beep codes
From this point forward, errors are reported with text messages displayed on the monitor.
6. When RAM and Video pass the POST test, a single beep occurs. The single beep exists simply to indicate that the diagnostic speaker is working. A malfunctioning speaker will prevent audible beep codes. -> You will begin to see text on the screen. The rapid numbers flashing indicate an in-depth RAM check. The screen will indicate the BIOS manufacturer and version number.
7. POST then checks keyboard. -> If an error occurs, a text message generally displays the on-screen
8. Legacy and then Plug and Play devices are identified -> The data gathered is then stored on the CMOS chip
9. CMOS data is queried against new current configuration data. Drives spin, lights flash, and sounds are heard. -> If there is a problem with the CMOS battery, you will get a text message.
10. Finding no major hardware errors, BIOS turns the process over to the boot loader.
11. The boot loader learns the boot sequence from the BIOS (e.g. A: C: CD-ROM, etc.) and looks for the Master Boot Record (MBR) on that device.
For hard disks, the boot loader looks for a partition table. The partition table will have a pointer to the MBR on the primary, active partition
12. The MBR contains the first file needed to start the operating system (IO.SYS in Windows 9x, boot.ini in NT).
13. The whole process is turned over to the OS and you see splash screens, etc.

Monday, January 11, 2010

Flush Out System Viruses

There are times when we encounter disturbance on a PC that is intermittent and erratic. Even after troubleshooting everything we can at the hardware, firmware (bios) & driver levels, we might feel a little lost. Some viruses can infect your system all the way down to the “System BIOS”.

These are generally called “WORM” or “BIOS” viruses and are considered to be “STEALTH”.
Undetectable by your VIRUS Protection Software, go ahead and SCAN anyway. Still the virus doesn’t seem to go away.

The ONLY solution is to remove the virus. Unfortunately, you will have to REFORMAT your system.
NOTE: This means you will have to backup your DATA!

Here are the STEPS:

1. REMOVE any existing PARTITIONS on your Hard Disks using FDISK, SETUP or NUKEM.

2. Dissipate the CMOS battery. Refer to your Motherboard Manual for instructions.
Open CASE, locate CMOS battery, remove battery, locate JUMPER adjacent to battery area, place JUMPER on pins 2 & 3, power on PC, power off PC, return JUMPER to pins 1 &2, replace the CMOS battery.

3. Power on PC, enter SETUP (DEL or F2), select LOAD SETUP DEFAULTS to restore the BIOS settings, setup your HDD type (select AUTODETECT IDE), select MAIN to set the TIME & DATE, save & exit SETUP. The PC reboots.

4. Insert OS BOOT DISK; boot PC to OS BOOT DISK; partition your HDD with FDISK then, POWER OFF for 20 seconds.

5. Reboot OS BOOT DISK; use FDISK to clear the Master Boot Record. (e.g.. FDISK /MBR)

6. Format your HDD (e.g.. FORMAT C: /S/U)
NOTE: If FORMAT reports: INVALID DRIVE SPECIFIED – The previous step kicked a virus out of the master boot record, repeat from step #2, you must have forgot a step.

7. Reload your OS.

Useful DOS Commands

Though DOS or Disk operated system appears to be an obsolete OS, with availability of Java, Linux etc., there are still some utilities that can be performed using a DOS command. Many times when I wanted to find a DOS command for a particular operation either I didn’t remember it or didn’t find a book to look out for it. So now as and how I remembered a few DOS commands I have listed them for everyone’s help.

ATTRIB –R –A –S –H FILENAME.TXT
- Removes the Read only, Archive, System & Hidden attributes
Use the + sign instead to add/restore the attributes
ATTRIB FILENAME.TXT /S
- Locate Hidden Files & search in all Subdirectories
Use this command to find files that DIR can’t…
FDISK - Hard Disk Partition Manager

FDISK /MBR - Removes any FOREIGN items from the Master Boot Record
* WARNING: Do Not Use with Drive Overlays!
FORMAT C: /S /U - Formats the Hard Disk w/System Boot Files Unconditionally

SYS C: - Places the System Boot Files on the Hard Disk non-volatility

COPY CON WHATEVER.TXT
- Creates new files when EDIT is NOT available
COPY the CON (keyboard) to this FILENAME
DIR *.* /O:D /S - Searches for All Files in the current directory & subdirectories, Organizes by Date, then reports a TOTAL in Bytes of all Files & Folders

* Use this command to determine the SIZE of a Directory Structure

COPY C:\WINDOWS\*.EXE A:\TEMP
- Copies all of the EXE files to the Floppy in Temp Folder

PATH - Check the current PATH (where the PC looks for commands)

TYPE C:\CONFIG.SYS
- Displays the contents of a file

EDIT C:\CONFIG.SYS
- Edits the contents of a file

Sunday, January 10, 2010

Everything you wanted to know about a motherboard – IV

Trusted Platform Module: The TPM is a microcontroller device installed on the motherboard that stores encryption keys, passwords, and digital certificates. It provides secure key generation that can be used to create and/or store both user and platform identity credentials for authentication.
· Offers improved, hardware based security
· Uses RSA and SHA-1 encryption algorithms to create an encryption key for a specific computer
· Encryption keys can be used for full-disk encryption, software licensing, and digital rights management
Power Supply: The computer’s power supply powers all internal components. Power supplies come in different wattage models ranging from 63.5 to 1000-plus watts. Each unit contains a power transformer that converts voltage from the wall socket to the power level the computer can safely use. The unit transmits a power good signal to the motherboard. This signal must be present continuously for the computer to run. If it is not, the computer shuts down instantly.
The power good signal performs several functions:
· Prevents the computer from starting until the appropriate level of operating voltage is reached
· Interfaces with the computer’s reset switch. When the reset switch is pressed, the power good signal is grounded out. When the switch is released, the power good resumes and the system reboots.

When comparing the ATX and the AT power supplies, the main plugs from the power supply to the motherboard are very different. The ATX has a single, form-fitted plastic plug that fits into an on-board socket that has a unique configuration. The plug is form fitted so that it will only fit into the socket in one direction.

ATX On-Board Power Socket (front view)

In contrast, the AT power supply has two separate plugs that fit into two separate on-board sockets. The wires on the plugs are color-coded. To make the correct connection, be sure to place the plugs into the sockets with the black wires of both plugs located directly next to each other. When properly connected, these black wires will be in the center of the two seated plugs.


AT Power Supply Socket (2 cords required)


Warning: Unlike the form-fitted ATX plug, the AT plugs can be connected incorrectly. If the AT plugs are not connected correctly, the motherboard will fail and a fire may occur.

Everything you wanted to know about a motherboard – III

Super I/O Chip: The Super I/O chip is the chip on the motherboard that integrates devices that were contained on expansion cards on older PCs. This chip allows for a faster transfer rate of data between the device and the system and has a lower failure rate. The Super I/O chip usually contains the following devices:
· Dual serial port controllers
· Floppy drive controller
· Parallel port controller
· Keyboard and mouse controllers

Jumpers: A jumper is a small plastic-covered metal clip that is placed over metal pins sticking out of the board. When placed on the pins, the jumper enables electricity to flow to the pins, completing the circuit. A jumper is considered closed when the plastic clip covers the pins.


Use: Jumpers are used to control device settings including processor speed and type, bus speed and CMOS password settings.
Dual Inline Package (DIP) switches are small switches embedded into circuit boards. They are used to configure the system functions including the bus speed, processor speed and processor type. DIP switches are toggled either On/Off or 1/0. Microsoft’s standard Plug and Play feature has made the use of DIP switches obsolete.

DIP Switch Example


Everything you wanted to know about a motherboard – II

BIOS: The motherboard basic input/output system (BIOS), also called the system BIOS, is considered to be the heart of the computer because it controls communications between computer hardware and the operating system. System BIOS is also referred to as ROM BIOS because the code is contained in a non-volatile, read-only memory (ROM) chip. As opposed to typical memory chips, non-volatile memory does not lose its contents when electricity is removed, making the chip suitable for storing data for many years. The system BIOS contains a software instruction set called firmware. Firmware provides the basic input/output instructions to boot the computer and handles several important functions including identifying hardware currently installed in the PC, determining which device will boot the PC, and installing basic drivers for the keyboard, video, and disk drives prior to the operating system loading.
Complementary Metal Oxide on Semiconductor (CMOS): CMOS is a chip that stores clock settings, the current system configuration data as discovered by a standard Power-On Self Test (POST) or defined by the setup program, and the Plug and Play settings. Located on the motherboard, CMOS is volatile and requires battery power to maintain the CMOS memory and system time whether the PC is on or off. Battery power comes from one of the following:
· Coin-type watch battery (commonly used)
· Brick/Barrel type battery
· Capacitor, an electrical component that holds a charge
Data stored in the CMOS chip is accessed by the system BIOS and also includes configurable settings such as boot sequence, CPU clock speed, and power management.

Chipset: The chipset controls the flow of information between various components of the motherboard. The chipset on a modern PC contains two or three separate chips and older PCs had as many as five chips. The largest chip is called the North Bridge; the smaller chip is called the South Bridge. The chipset controls many different components of the system including:
· CPU
· Cache
· Main memory
· Peripheral Component Interconnect (PCI) bus
· Industry Standard Architecture (ISA) bus
· Various system resources
In addition, the chipset defines the various functions the system will support including:
· Defines Front-side Bus (FSB) speed (from 66MHz to over 1000MHz)
· Supports Accelerated Graphics Port (AGP) video cards
· Defines the minimum and maximum processor speed the motherboard can handle
The major chipset manufacturers are Intel, Apollo, VIA, and SIS.

Everything you wanted to know about a motherboard - I


The motherboard is the main circuit board of the computer. Every component is connected to it in some way. Motherboards contain slots that hold the processor, expansion cards, and connectors for attaching additional boards. Typically, you will find the following components on the motherboard:
· CPU
· ROM (System BIOS)
· Serial and parallel ports
· Memory
· Chipset
· Clock and Complementary Metal Oxide Semiconductor (CMOS) battery
· Mass storage interface
· Expansion slots
· Connectors for peripherals including monitor, keyboard, and disk drive(s)

Intel introduced the ATX in 1996 as a replacement for the Baby-AT. It was considered the first dramatic improvement in motherboard form factors used in desktop PCs. The ATX provided a standard, nonproprietary design that was easy to install and maintain. Many modern motherboards use this same form factor (9 inches wide by 12 inches long.)
ATX was the first to integrate components such as the Flash BIOS and I/O logic. The ATX motherboard is half the width of earlier motherboards and contains combinations of ISA and PCI slots, expansion slots that are covered in depth later in this lesson. The power connector for the ATX is one form-molded power connector that prevents it from being connected incorrectly.

Example of ATX Motherboard


ATX-class and above motherboards may be configured for suspend or power-off functions that are initiated by the operating system. This is especially true with the Microsoft Window XP or higher versions. During suspend, the system goes into a low power state called a sleep mode. Contents of RAM are saved during this state to allow the machine to wake up quickly with all running applications remaining open. The system awakes after the mouse or keyboard is used. During power-off, the system shuts down completely after exiting the operating system.
The following motherboard form factors were developed by Intel as evolutions of the original ATX:

· Micro ATX was built as a smaller design for use in the first small, low-cost computer systems sold in retail stores for under $1,000. The reduced size (9.5 inches wide by 9.5 inches long) allowed for a smaller power supply and few I/O bus expansion slots.
· Flex ATX was introduced as a smaller version of the Micro ATX and considered the least expensive motherboard of the ATX family. It will only support the socket-type CPU (size: 9 inches wide by 7.5 inches long).
· WTX was designed as a high-performance ATX. It is a relatively new board used in high-end servers and workstations. It contains a flex slot that is an enlarged PCI slot used to hold powerful multifunction cards (size: 14 inches wide by 16.75 inches long).

Sunday, January 3, 2010

Troubleshooting a dead PC in simple steps:

Please shut down the pc, unplug the power and all the connected peripherals before carrying out the the following steps. Bulleted sentences have to be carried out before trying any troubleshooting.
Failure to do so can result in irrecoverable damages to the motherboard and / or device which are handled!

Caution:
If you have access to a Switchable, earthed power strip, please put this between the Main power and all the peripherals that are electrically connected to your computer (monitor, printer, scanner etc.).
This will prevent the computer system to be damaged by Earth related voltages that can make a pathway to ground on contact with your body, damaging the electronic circuits in the process.

Steps that are not applicable are those on which the hardware is not present. You can safely skip these steps. Shut down your computer and open the system casing.

Check that the PC speaker is working and attached to the correct pins of the Motherboard.
You would need a working speaker during one of the following operations! In case of doubt, get a speaker from another computer temporarily.
Verify that the power outlet is energised by checking that a lamp when attached glows.
Check for cracks / damages to the power cable connecting the PC. If the power plug of your computer has its own Fuse, check this too.
Check the switch on the back of the Power supply unit whether it is set to "1".When you power up the system, ensure that the PSU is working.
When you press the eject button of a DVD drive, does the DVD inserting slot slide out and does the CPU / PSU fan and hard drive(s) spin up?

· On the Motherboard you can find a CR 2032 Lithium cell, measure its voltage with a voltmeter. It MUST be ABOVE 2.5 Volts. If it is lower than that or show a Zero, replace that cell. If OK / replaced, put the cell back in, repower the system and see if it will boot.

· If there is no CR 2032 Lithium cell, it is most common that there is an Integrated RTC CMOS Battery block (black block) somewhere on the Motherboard. (You cannot test this device).It is commonly called DALLAS and has a Mechanic alarm clock icon on it.
· Search for the CMOS reset (RTC Clear) jumper and set it for a few seconds. If it is a three-pin Jumper, set it over the centre and now open the pin. UNSET it before repowering! Some Motherboards have two adjacent tin fields that have to be shorted for a few seconds. Power on the system and see if it will boot.
· If you are unsuccessful, go to the connector section where all the Front Panel connectors are connected. Look closely at what is connected to the RESET connector of your Motherboard and take it off. There could be a short circuit in the Reset switch or some foreign bodies are connected. Power on the system WITHOUT something connected to the RESET pins and see if it will boot.

FOR ATX systems ONLY-


· Take off the POWER button leads and measure the resistance with an Ohmmeter. At normal, it should measure Infinite. When pressed, it MUST measure less than 2 Ohms. If not, that button must be replaced. For the time being, put the RESET button in place if that one is still good (it does exactly the same).
· If unsuccessful, check the Power cable(s) that run(s) from the PSU to the Motherboard. Is / are they properly connected to the Motherboard? With the AT (2-connector) system, ENSURE that all the BLACK wires meet in the middle of the two connectors. Otherwise it is Instant Death for the Motherboard (and the CPU) if the PSU starts up. Power on the system and see if it will boot.
· If not, press ALL the connectors, cards and chips that are inserted in the sockets to verify / ensure that they are properly seated in their slots. It could be a card that is not pressed in completely. Power on the system and see if it will boot.
· If not either, check the IDE connections on both the hard drive(s) /DVD drive(S) and your Motherboard. Some motherboards do NOT boot if the connectors are connected incorrectly due to misplaced TTL signals. Verify and set if not: PIN 1 / colored wire should face the power connector(s) of the drive(s) and pin #1 in the slot on the Motherboard.

If the headers of the Motherboard connectors have a "hole" in one of their long sides, this is the indication that pin-1 is on ABSOLUTE-LEFT of that "hole". Applies when the Header is turned / visualised in this way that it is horizontally and the "hole" is in the lower rail. It is also an "Idiot-Proof" system with newer cables that have an extended notch on one of their long sides. Power the system and see if it will boot.
· If still no result, check if the Jumper settings for FSB and Multiplier are still correct for the CPU. Look under the Heat sink (if present)! The CPU could have been traded for a lower / defective one when others have attempted to "Repair" your system! An 8088 and an 8086 can be inserted incorrectly one way and correctly one way. An 80386, 80387 (FPU) and an 80486 CPU (and some AMD / Cyrix CPU's) can be inserted incorrectly three ways and correctly ONE way. If found in an incorrect position, (PIN 1 NOT on the Mark on the Socket) DO NOT USE THAT CPU / FPU anymore! The CPU / FPU is SURELY a goner! (and so could your Motherboard!)
· If still nothing happens, pull out ALL memory chips and reboot (if it was the memory, you now hear some beeps out of the Speaker).
· Set in ONE of the memory chips and retry.
· If no result, exchange the memory chip for another one (if any) and retry.
· If working, leave it in, insert the next untested memory chip (if any) and retry.
· If dead again you have found a defective Memory chip. Take it out.
· If dead ALL the time, put all the chips back in and advance to the next step.
· Pull out ALL PCI / ISA / AGP cards and boot it up.
· If working (you heard some beeps from the speaker), than put the Videocard card back in its original slot and retry
· If NO boot with the Videocard, that card is the cause and must be replaced for a new / good one.
· If working, repeat this for the other cards (leave known good cards in place!). Place the cards back into the slots from which they came to avoid redetection / re-installation by Windows.
· If still no positive result from any test, the Motherboard, PSU, Memory or the CPU might be defective (or any combination of these).

Saturday, January 2, 2010

Minimum Requirements for Student Computer:

This is an age of information and technology. Nationwide many schools are set up for students up to the age of 16 years. Earlier schools were recognized if they had laboratories for chemistry alone. Current trends indicate that parents of the students check out whether the school has a computer lab with at least 25 computers, before taking admission in a school. Setting up a school itself is a big investment so a school computer lab should not burn deep holes in the pockets of the managements. Given below is a configuration which is highly effective and economical for setting up a computer lab.

Internet Access and Speed
These are the days of technological advances, so a broadband connection with a bandwidth of 10Mbps is sufficient for the lab.

Browser Plug-ins
· Sun Java JRE which can be downloaded free
· Sun Java 3D  1.3 or higher - Required in some courses
· Flash 9.0 or higher
· Acrobat Reader 9 or higher

PC Requirements
· Pentium IV or higher (1.2 GHz minimum, higher recommended)
· Minimum of 100 gigabytes free HDD space
· Windows XP SP2 minimum or Windows 7 or Linux
· Microsoft Office, Open Office or Google Docs
· 1 GB Ram
· DVD drive
· Display setting 1024x768 resolution 
· Printer required
· Internet Explorer version 7.0 or higher or Firefox version 5.0 or higher
· Students need a method to save work to a portable medium (CD, USB)
· Audio:  Sound card with speakers, microphone or headset

A note of caution is that it is better to buy branded PC from the OEMs or their authorized resellers as this would help you with warranties and annual maintenance contracts. This ensures that one can concentrate on the primary business of running the educational institution